We have a nicely running little Raspberry PI that we use as a Pandora radio at the Gold Coast TechSpace. It’s a great setup and people have enjoyed upping and downing tracks on the playlists to get a good mix of tunes that we all like. We run the pianobar application which gives a really simple command line interface that works beautifully with us.
I wanted to make it even better by having some big buttons that people could hit to like/dislike a track or just move on to the next (don’t want to ban it - just tired of it).
How could I do this simply? Well - I realised that by replacing the DFU bootloader you can turn any Arduino into a HID device to control keyboard and mouse (imagine the prank opportunities here people!)
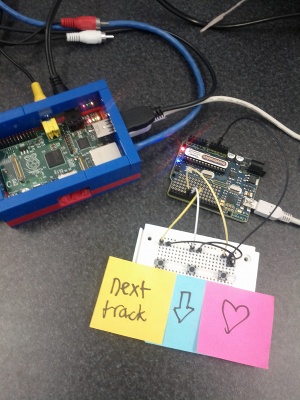
Anyway - here is my MVP (Minimum Viable Product) that is now being used at the space and getting me early feedback.
I don’t have the big buttons yet, I’ve just hooked up some simple little push buttons to a breadboard and an Arduino (Freetronics Eleven). Once I get it more finished I might move it to a Leostick.
Here is my initial arduino sketch, I realise now there are better ways to handle multiple presses in hardware using interupt lines or capacitors, but for my initial release this seemed to work:
uint8_t buf[8] = {
  0 }; 	/* Keyboard report buffer */

#define PIN_LOVE 5
#define PIN_HATE 6
#define PIN_NEXT 7
#define LED 13

int love = 1;
int hate = 1;
int next = 1;
int state = 1;

void setup()
{
  Serial.begin(9600);
  pinMode(PIN_LOVE, INPUT);
  pinMode(PIN_HATE, INPUT);
  pinMode(PIN_NEXT, INPUT);
  // enable internal pull-ups
  digitalWrite(PIN_LOVE, 1);
  digitalWrite(PIN_HATE, 1);
  digitalWrite(PIN_NEXT, 1);

  delay(200);
}

void loop()
{
  state = digitalRead(PIN_LOVE);
  if (state != 1 && love == 1) {
    buf[2] = 87;	  // + key
    Serial.write(buf, 8);	// Send keypress
    releaseKey();
  }
  love = state;

  state = digitalRead(PIN_HATE);
  if (state != 1 && hate == 1) {
    buf[2] = 86;	  // - key
    Serial.write(buf, 8);	// Send keypress
    releaseKey();
  }
  hate = state;

  state = digitalRead(PIN_NEXT);
  if (state != 1 && next == 1) {
    buf[2] = 17;	  // n key
    Serial.write(buf, 8);	// Send keypress
    releaseKey();
  }
  next = state;

}

void releaseKey()
{
  buf[0] = 0;
  buf[2] = 0;
  Serial.write(buf, 8);	// Release key
}
Note: The numbers you see for the keypresses are not ASCII codes - you need to refer to the HID spec to get the correct codes for your keyboard.
Upload the sketch to the Arduino, the board will be doing nothing until you load the keyboard firmware. To do this you have to use the dfu_programmer utility that is in the standard ubuntu repos.
However for it to work, you need to reset the DFU so it can take commands, to find out all about this have a look at the DFU programming guide - the key section is “Reset the 8u2”.
This is what I did:
- jumper the reset pin with the ground (near the USB connector)
- Whilst the pins are jumpered, press and hold the reset pushbutton
- remove the jumper, then release the reset pushbutton. Usually D13, will blink a few times quickly after releasing the jumper.
Now you should be able to run the dfu-programmer utility:
sudo dfu-programmer at90usb82 erase
sudo dfu-programmer at90usb82 flash Arduino-keyboard-0.3.hex
sudo dfu-programmer at90usb82 reset
When you need to put the old bootloader firmware on (ie. to load a new sketch) do this:
sudo dfu-programmer at90usb82 erase
sudo dfu-programmer at90usb82 flash Arduino-usbserial.hex
sudo dfu-programmer at90usb82 reset
Remember you will have to do the reset trick every time. There are quicker ways using dedicated programmers - but this worked for me.
Once the keyboard DFU bootloader is in place, when I hit the keys on my arduino it will now send the keys +, - and “n” to the Raspberry PI. Simple but effective.
My next step for version 0.2 is to put some proper coloured buttons on it, put it in a better case (probably an extension of my lego case) and tidy up the code a bit.